
readonly
public 일 때 접근할 순 있지만 내용을 수정하진 못하게 한다.
class Dict {
	private words: Words
    constructor(){
    	this.words = {}
    }
    add(word: Word){
    	if(this.words[word.term] === undefined){
   			this.words[word.term] = word.def;
   		 }
   }

   class Word{
	constructor(
    	public readonly term:string,
        public readonly def :string
        ) {}
}

const kimchi = new Word("kimchi", "한국의 음식");
kimchi.def = "..." //readonly이기 때문에 불가능하다.readonly인 경우 수정은 불가능 하지만 다른 클래스에서 그 값을 불러오는 것은 가능하다.
주로 다른 사람이 데이터를 덮어쓰는 것을 방지하기 위해서 private나 protected property를 많이 사용하는데 public readonly를 이용할 수도 있다.
type
type은 다양한 방법으로 지정할 수 있다.
//1.
type Player = {
	nickname: string,
    Age : number
}


//2.
type taste = string

const kimchi: taste = "delicious";이 외에도 별칭을 사용해서 더 확장할 수도 있다.(필요에 따라)
//1+.
type Nickname = string;
type Age = number;
type Player = {
	nickname: Nickname,
    Age : Age
}
타입을 지정된 옵션으로 제한하기
Player class를 만들고 nickname과 team을 설정할 건데 team의 타입이 string이지만 특정 string이 되도록 할 것이다.
type Team = "read" | "blue" | "yellow"
type Health = 1 | 5 | 10
type Player = {
	nickname: string,
   	 team: Team,
     health: Health
}

const nico : Player = {
	nickname: "nico",
    team: "yellow",
    health: 10
}지금까진 콘크리트 타입을 지정해왔지만 그 콘크리트타입 내의 특정한 값을 타입으로 지정할 수도 있다.
이렇게 설정하면 Team은 모든 string이 아니라 read 또는 blue 또는 yellow만 될 수 있다.
interface
오브젝트의 모양을 설명하는 다른 방법
인터페이스는 컴파일하면 JS로 바뀌지 않고 사라진다.
type Team = "read" | "blue" | "yellow"
type Health = 1 | 5 | 10

interface Player {
	nickname: string,
   	 team: Team,
     health: Health
}

const nico : Player = {
	nickname: "nico",
    team: "yellow",
    health: 10
}오브젝트의 모양을 정하는 것은 type, interface 두 가지의 방법이 있는데,
type은 string, 배열 등 다양한 형태로 사용할 수 있지만 interface의 목적은 단 하나이다. 오브젝트의 모양을 특정해주기 위한 것!
상속하기
인터페이스가 좀 더 클래스를 다루는 것과 비슷하다!
//1.interface 사용
interface User {
	name: string
}

interface Player extends User {
}

const nico: Player = {
	name: "nico"
}

//2. type 사용
type User = {
	name: string
}

type Player = User & {
}

const nico: Player = {
	name: "nico"
}이처럼 interface와 type이 똑같은 기능을 하지만 모양이 다르다! 더 편한 방식으로 사용하면 된다.
interface의 또다른 기능은 축적이 가능하다는 것이다.
interface User {
	name: string
}

interface User {
	lastname: string
}

interface User {
	age: number
}

const nico: User{
	name: "nico",
    lastname: "n",
    age: 10
}이렇게 3개의 User interface를 만들어도 자동으로 축적되어 사용할 수 있다.
또한 인터페이스 역시 클래스를 타입으로 사용한 것처럼 인터페이스를 타입으로 사용할 수 있다.
function makeUser(user: User){
	return "hi"
}
즉 interface와 type 의 가장 큰 차이점 2가지는 첫 번째,상속의 형태이고 두 번째 축적이 가능한가 이다.
오브젝트의 모양을 지정할 땐 interface를 쓰고 그 외엔 type을 쓰는 것이 일반적.
추상 클래스와 인터페이스의 차이점
추상 클래스에 대해 가볍게 살펴보자면,
abstract class User {
constructor(
protected firstName:string,
protected lastName:string
) {}
abstract sayHi(name: string):string
abstract fullName(): string
}
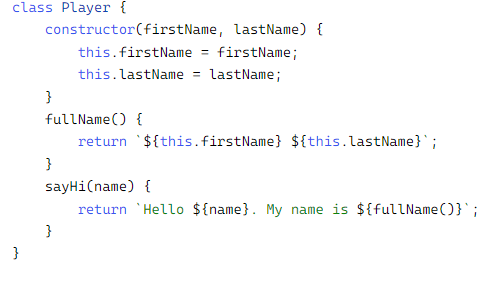
class Player extends User {
fullName(){
return `${this.firstName} ${this.lastName}`
}
sayHi(name: string){
return `Hello ${name}. My name is ${fullName()}`
}
}이렇게 클래스들의 property와 메소드를 지정하기 위해서 추상 클래스를 사용한다. 하지만 이 내용이 JS로 컴파일됐을 때
이처럼 추상 클래스 부분이 JS에서는 적용되지 않는다. 추상 클래스는 인스턴스화할 수 도 없어서 USer 클래스는 JS에서 사용되지 않지만 JS에 존재하는 것이다. 이럴 때 인터페이스가 필요하다. 인터페이스는 가벼워서 JS로 컴파일되지 않기 때문이다.
추상클래스를 인터페이스로 바꾸기
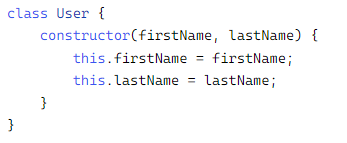
interface User {
	firstName:string,
	lastName:string,
	sayHi(name: string):string
	fullName(): string
}

class Player implements User {
	constructor(
    	private firstName: string,
        private lastName: string
    ){}
    fullName(){
    	return `${this.firstName} ${this.lastName}`
    }

    sayHi(name: string){
    	return `Hello ${name}. My name is ${this.fullName()}`
    }

}
추상 클래스를 interface로 바꿔주고 extends가 아닌 implements를 사용해주었다. extneds는 JS 문법이라서 JS로 컴파일되어 클래스가 상속되어버리기 때문에 extends를 사용하지 않았다. 따라서 implements를 사용함으로써 interface가 JS로 컴파일되지 않도록 하는 것이다.
이렇게 interface는 컴파일되지 않는다. 하지만 여전히 에러가 뜨는데 그것은 interface를 상속할 때 private를 사용하지 못한다는 것이다. 따라서 public 만 사용 가능하다.
interface를 사용하는 경우 JS로 컴파일되지 않는다는 것이 interface와 추상 클래스의 가장 큰 차이이다. 따라서 interface를 사용하면 파일의 용량을 줄일 수 있지만 private property를 사용하지 못하고 constructor 부분을 interface 내에서 적어주지 못한다는 것을 알아두어야 한다.
여러 개의 인터페이스 동시에 상속하기
interface User {
	firstName:string,
	lastName:string,
	sayHi(name: string):string
	fullName(): string
}

interface Human {
	health: number
}

class Player implements User, Human {
	constructor(
    	public firstName: string,
        public lastName: string.
        public health: number
    ){}
    fullName(){
    	return `${this.firstName} ${this.lastName}`
    }

    sayHi(name: string){
    	return `Hello ${name}. My name is ${this.fullName()}`
    }

}
'개발 공부 > TypeScript' 카테고리의 다른 글
| TypeScript #3 [class, 추상 클래스, 추상 메소드, protected] (0) | 2022.07.31 |
|---|---|
| TypeScirpt#2 [함수, call signatures, overloading, 다형성, 제네릭] (0) | 2022.07.27 |
| TypeScript #1 [type] (0) | 2022.07.25 |
readonly
public 일 때 접근할 순 있지만 내용을 수정하진 못하게 한다.
class Dict {
	private words: Words
    constructor(){
    	this.words = {}
    }
    add(word: Word){
    	if(this.words[word.term] === undefined){
   			this.words[word.term] = word.def;
   		 }
   }

   class Word{
	constructor(
    	public readonly term:string,
        public readonly def :string
        ) {}
}

const kimchi = new Word("kimchi", "한국의 음식");
kimchi.def = "..." //readonly이기 때문에 불가능하다.
readonly인 경우 수정은 불가능 하지만 다른 클래스에서 그 값을 불러오는 것은 가능하다.
주로 다른 사람이 데이터를 덮어쓰는 것을 방지하기 위해서 private나 protected property를 많이 사용하는데 public readonly를 이용할 수도 있다.
type
type은 다양한 방법으로 지정할 수 있다.
//1.
type Player = {
	nickname: string,
    Age : number
}


//2.
type taste = string

const kimchi: taste = "delicious";
이 외에도 별칭을 사용해서 더 확장할 수도 있다.(필요에 따라)
//1+.
type Nickname = string;
type Age = number;
type Player = {
	nickname: Nickname,
    Age : Age
}
타입을 지정된 옵션으로 제한하기
Player class를 만들고 nickname과 team을 설정할 건데 team의 타입이 string이지만 특정 string이 되도록 할 것이다.
type Team = "read" | "blue" | "yellow"
type Health = 1 | 5 | 10
type Player = {
	nickname: string,
   	 team: Team,
     health: Health
}

const nico : Player = {
	nickname: "nico",
    team: "yellow",
    health: 10
}
지금까진 콘크리트 타입을 지정해왔지만 그 콘크리트타입 내의 특정한 값을 타입으로 지정할 수도 있다.
이렇게 설정하면 Team은 모든 string이 아니라 read 또는 blue 또는 yellow만 될 수 있다.
interface
오브젝트의 모양을 설명하는 다른 방법
인터페이스는 컴파일하면 JS로 바뀌지 않고 사라진다.
type Team = "read" | "blue" | "yellow"
type Health = 1 | 5 | 10

interface Player {
	nickname: string,
   	 team: Team,
     health: Health
}

const nico : Player = {
	nickname: "nico",
    team: "yellow",
    health: 10
}
오브젝트의 모양을 정하는 것은 type, interface 두 가지의 방법이 있는데,
type은 string, 배열 등 다양한 형태로 사용할 수 있지만 interface의 목적은 단 하나이다. 오브젝트의 모양을 특정해주기 위한 것!
상속하기
인터페이스가 좀 더 클래스를 다루는 것과 비슷하다!
//1.interface 사용
interface User {
	name: string
}

interface Player extends User {
}

const nico: Player = {
	name: "nico"
}

//2. type 사용
type User = {
	name: string
}

type Player = User & {
}

const nico: Player = {
	name: "nico"
}
이처럼 interface와 type이 똑같은 기능을 하지만 모양이 다르다! 더 편한 방식으로 사용하면 된다.
interface의 또다른 기능은 축적이 가능하다는 것이다.
interface User {
	name: string
}

interface User {
	lastname: string
}

interface User {
	age: number
}

const nico: User{
	name: "nico",
    lastname: "n",
    age: 10
}
이렇게 3개의 User interface를 만들어도 자동으로 축적되어 사용할 수 있다.
또한 인터페이스 역시 클래스를 타입으로 사용한 것처럼 인터페이스를 타입으로 사용할 수 있다.
function makeUser(user: User){
	return "hi"
}
즉 interface와 type 의 가장 큰 차이점 2가지는 첫 번째,상속의 형태이고 두 번째 축적이 가능한가 이다.
오브젝트의 모양을 지정할 땐 interface를 쓰고 그 외엔 type을 쓰는 것이 일반적.
추상 클래스와 인터페이스의 차이점
추상 클래스에 대해 가볍게 살펴보자면,
abstract class User {
	constructor(
    	protected firstName:string,
        protected lastName:string
    ) {}

    abstract sayHi(name: string):string
    abstract fullName(): string
}

class Player extends User {
	fullName(){
    	return `${this.firstName} ${this.lastName}`
    }

    sayHi(name: string){
    	return `Hello ${name}. My name is ${fullName()}`
    }
}
이렇게 클래스들의 property와 메소드를 지정하기 위해서 추상 클래스를 사용한다. 하지만 이 내용이 JS로 컴파일됐을 때
이처럼 추상 클래스 부분이 JS에서는 적용되지 않는다. 추상 클래스는 인스턴스화할 수 도 없어서 USer 클래스는 JS에서 사용되지 않지만 JS에 존재하는 것이다. 이럴 때 인터페이스가 필요하다. 인터페이스는 가벼워서 JS로 컴파일되지 않기 때문이다.
추상클래스를 인터페이스로 바꾸기
interface User {
	firstName:string,
	lastName:string,
	sayHi(name: string):string
	fullName(): string
}

class Player implements User {
	constructor(
    	private firstName: string,
        private lastName: string
    ){}
    fullName(){
    	return `${this.firstName} ${this.lastName}`
    }

    sayHi(name: string){
    	return `Hello ${name}. My name is ${this.fullName()}`
    }

}
추상 클래스를 interface로 바꿔주고 extends가 아닌 implements를 사용해주었다. extneds는 JS 문법이라서 JS로 컴파일되어 클래스가 상속되어버리기 때문에 extends를 사용하지 않았다. 따라서 implements를 사용함으로써 interface가 JS로 컴파일되지 않도록 하는 것이다.
이렇게 interface는 컴파일되지 않는다. 하지만 여전히 에러가 뜨는데 그것은 interface를 상속할 때 private를 사용하지 못한다는 것이다. 따라서 public 만 사용 가능하다.
interface를 사용하는 경우 JS로 컴파일되지 않는다는 것이 interface와 추상 클래스의 가장 큰 차이이다. 따라서 interface를 사용하면 파일의 용량을 줄일 수 있지만 private property를 사용하지 못하고 constructor 부분을 interface 내에서 적어주지 못한다는 것을 알아두어야 한다.
여러 개의 인터페이스 동시에 상속하기
interface User {
	firstName:string,
	lastName:string,
	sayHi(name: string):string
	fullName(): string
}

interface Human {
	health: number
}

class Player implements User, Human {
	constructor(
    	public firstName: string,
        public lastName: string.
        public health: number
    ){}
    fullName(){
    	return `${this.firstName} ${this.lastName}`
    }

    sayHi(name: string){
    	return `Hello ${name}. My name is ${this.fullName()}`
    }

}
'개발 공부 > TypeScript' 카테고리의 다른 글
| TypeScript #3 [class, 추상 클래스, 추상 메소드, protected] (0) | 2022.07.31 |
|---|---|
| TypeScirpt#2 [함수, call signatures, overloading, 다형성, 제네릭] (0) | 2022.07.27 |
| TypeScript #1 [type] (0) | 2022.07.25 |